Here I come after 2 months long exam period break, sorry guys! The semester is over, I can live again (my fellow law students will understand me). I managed not only to pass all the exams, but I have also been to Belgium to visit friend of mine (you can expect travelling related post as soon as I fight my laziness and edit all the pictures!). However, I am in completely spring mood lately, because it has been quite warm in Czech republic for last two weeks, yay! This spring-related enthusiasm is also the background of today's post. I love these bracelets and they always remind me of spring/summer aka sunny weather, short plain dress and denim jacket. :) They are easy to make and perfect for stacking. I also love to give the leather ones as a gift because they look quite classy. If you want to see how to make these, keep reading.
Materials required:

For friendship bracelets:
thread of different colours (amount varies according to desired pattern)
safety pin + scissors
For leather bracelets:
2 leather strings (90cm lenght should be enough)
shoelace or some kind of thicker string for the "base"
studs (optional)
scissors

As leather bracelets are not that common in blogosphere and I personally like them more, let's begin with those, shall we?
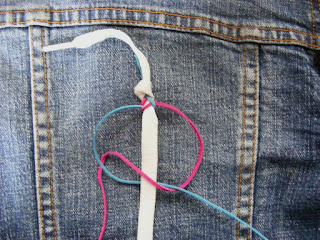
Start with tying the "base" string and two leather strings in a knot. The process of bracelet-making is easy - just tie knot like shown in the picture on right and then tie this very same knot, but reverse. The pink string, in my case, is the only string that is supposed to go over the base string. Anytime. Keep tying knots like this until the bracelet is of your desired length. Finish the bracelet by tying all 3 strings in know like you did at the beginning and voilá - you are done! Unless you want to add some studs, of course. :)
Note: If you use regular strings, not round ones, I highly recommend taking extra time and adjusting them right so that you end up with neatly looking bracelet sides and not weird curly ones. However, nobody is gonna notice this from distance, it is just my (sometimes) overly neat personality what makes a big deal out of it. ;)

Friendship bracelets are evergreen - I remember how we kept making them during class back in elementary school. Whoever came up with cute new pattern was the king (queen?) of the day. During all those years, I came up with tons of new patterns and I have decided to share those, that I liked the most.
The basic technique is very simple - you just tie knots like shown in the picture on left. I usually tie two knots, because it makes the bracelet look way more neat. You can tie these knots both, left and right sided (the one in the picture is right sided, you start with loop on the left side to get left sided one ^^). You can also make middle knot which is useful for making arrows and patterns based on arrows - just tie one know left sided and one knot right sided.
The process itself goes like this - start tying knots with your "main string" on your "base strings" and keep going until you are left with no "base strings" or until the pattern tells you otherwise (eg. for the diamond pattern you will start by middle knot and then work your way to both sides, each using gray colour as "main string").
To make bracelets that are shown in the intro picture, follow these simple patterns (black lines suggest whether the know is left side, right side or middle knot):
Note: I suggest starting with either crossed stripes or checkered bracelet, because diamond pattern is slightly more advanced and you need to be more precise in order to make it look good.


